Deploy a Node.js App on AWS Lambda with DynamoDB Using the Serverless Framework: A Step-by-Step Guide
Full-Stack Developer | MERN + Next.js | DevOps & Cloud Enthusiast
I specialize in building dynamic web applications using the MERN stack and Next.js. Currently exploring DevOps and cloud technologies to streamline workflows, automate deployments, and optimize cloud infrastructure for scalable, efficient solutions.
Deploying applications in a serverless environment is becoming increasingly popular for its cost-effectiveness and ease of scaling. In this guide, you’ll learn how to deploy a Node.js application on AWS Lambda using the Serverless Framework, and connect it to DynamoDB. By the end, you’ll have a fully functional serverless app that interacts with DynamoDB, all with minimal setup and management!
1. What is the Serverless Framework?
The Serverless Framework is an open-source framework that helps developers manage serverless deployments on various cloud platforms, including AWS, Azure, and Google Cloud. It simplifies deploying serverless applications by allowing you to define resources and functions in a configuration file, eliminating the need for complex infrastructure setup.
2. Prerequisites
To follow along with this guide, ensure you have the following:
Node.js and npm: Install the latest version of Node.js from nodejs.org.
AWS Account: Set up an AWS account with access to Lambda and DynamoDB services. Sign up here.
Serverless Framework: Install it globally by running the command below if you haven’t already:
npm install -g serverless
3. Setting Up a New Serverless Project
The first step is to create a Serverless project that will serve as the base for deploying your AWS resources and functions.
Steps:
Create the Project
Open your terminal and run the following command:💡Make sure to create your account on serverless website and validate your credentials through terminal.serverlessThis will show you several Templates. Choose 3rd option Aws / Node.js / Express Api with Dynamodb
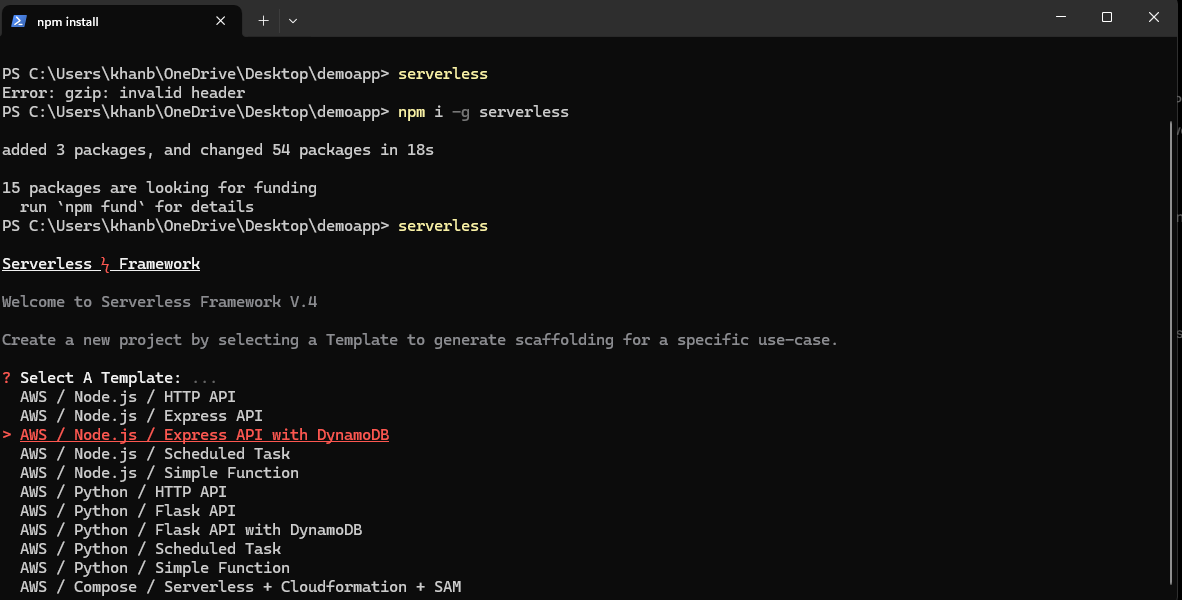
Then, select your project name in that folder. The Serverless Framework will generate your complete boilerplate code
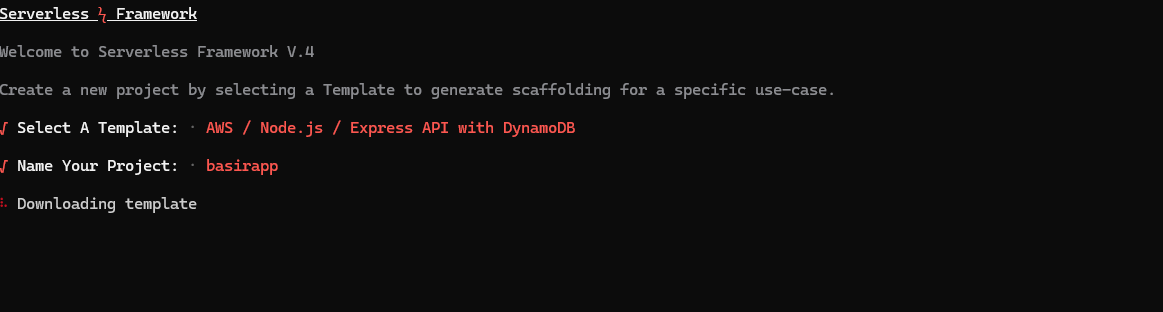
- Then select create a new app to continue.

4. Next, provide an app name. A Lambda function will be created with this name

- Install Dependencies
All ready some dependencies are installed through boiler plate code and we have to add some more dependencies for this project
cd "your project name"
npm i
    npm i crypto-js
    npm i jsonwebtoken
    npm i cors
The aws-sdk library is essential for integrating our app with AWS services.That is already installed if you selected aws + node.js+dynamodb template.
4. Configuring serverless.yml for Lambda and DynamoDB
The serverless.yml file defines your resources and functions. Here’s how to configure it to create a Lambda function and DynamoDB table.
Edit the serverless.yml file as follows:
# "org" ensures this Service is used with the correct Serverless Framework Access Key.
org: basir #change this according to your orgname
# "app" enables Serverless Framework Dashboard features and sharing them with other Services.
app: basirapp #change this to your app name
# "service" is the name of this project. This will also be added to your AWS resource names.
service: basirapp #change this according to your service name

stages:
  default:
    params:
      tableName: "basirtable" #change or create this on your aws account

provider:
  name: aws
  runtime: nodejs20.x
  region: ap-south-1
  iam:
    role:
      statements:
        - Effect: Allow
          Action:
            - dynamodb:Query
            - dynamodb:Scan
            - dynamodb:GetItem
            - dynamodb:PutItem
            - dynamodb:UpdateItem
            - dynamodb:DeleteItem
          Resource:
            - Fn::GetAtt: [UsersTable, Arn]
  environment:
    USERS_TABLE: ${param:tableName}
  httpApi:
    cors:
      allowedOrigins:
        - '*'  # Allows all origins; use specific origins for production
      allowedHeaders:
        - Content-Type
        - Authorization
        - X-Amz-Date
        - X-Api-Key
        - X-Amz-Security-Token
        - X-Requested-With
      allowedMethods:
        - GET
        - POST
        - PUT
        - DELETE
        - OPTIONS
      maxAge: 86400

functions:
  api:
    handler: handler.handler
    events:
      - httpApi:
          path: "/{proxy+}"  # Correct syntax for a catch-all route
          method: ANY

resources:
  Resources:
    UsersTable:
      Type: AWS::DynamoDB::Table
      Properties:
        AttributeDefinitions:
          - AttributeName: email
            AttributeType: S
        KeySchema:
          - AttributeName: email
            KeyType: HASH
        BillingMode: PAY_PER_REQUEST
        TableName: ${param:tableName}
Explanation:
org, app, and service:
The
orgspecifies the Serverless Framework organization (basir), ensuring that the service is linked with the correct Serverless Framework Access Key.The
appname (basirapp) enables features on the Serverless Framework Dashboard, facilitating easier management and sharing with other services.The
service(basirapp) is the name of this project, which will also be included in the names of the AWS resources created by this service.
stages:
- Defines a default stage with a parameter
tableName, set to"basirtable". This parameter is referenced throughout the configuration to specify the DynamoDB table name.
- Defines a default stage with a parameter
provider:
Specifies AWS as the cloud provider and sets the runtime to
nodejs20.x.The
regionis defined asap-south-1.Configures an IAM role with permissions to perform various DynamoDB actions (
Query,Scan,GetItem,PutItem,UpdateItem, andDeleteItem) on the specified DynamoDB table.The
environmentsection defines an environment variableUSERS_TABLE, which utilizes thetableNameparameter value (basirtable) for use within Lambda functions.
httpApi:
Configures CORS (Cross-Origin Resource Sharing) settings to allow requests from any origin (
allowedOrigins: '*'). For production environments, it is advisable to specify allowed origins explicitly.Specifies the headers and HTTP methods that are permitted in requests, along with a cache duration of
maxAge: 86400seconds (24 hours).
functions:
Defines a Lambda function named
api, with the handler implemented inhandler.handler.Sets up an
httpApievent with a catch-all route (/{proxy+}) that allows all HTTP methods (method: ANY) to facilitate flexible request handling.
resources:
Creates an AWS DynamoDB table named
UsersTable.The table's primary key is defined by the
emailattribute, which is of typeString(S).Configured with
BillingMode: PAY_PER_REQUEST, allowing the table to automatically scale and bill based on the number of requests.The table name is dynamically set using the
tableNameparameter (basirtable).
5. Writing the Lambda Handler Code
Next, create the Lambda function to save data to DynamoDB.
Steps:
Update handler.js code into your project
In the root of the project. updatehandler.js.Add the Following Code:
 const { DynamoDBClient } = require("@aws-sdk/client-dynamodb");

 const {
   DynamoDBDocumentClient,
   GetCommand,
   PutCommand,
 } = require("@aws-sdk/lib-dynamodb");
 const crypto  = require("crypto-js");
 const jwt = require("jsonwebtoken");
 const express = require("express");
 const serverless = require("serverless-http");
 const cors = require('cors');
 const app = express();

 const USERS_TABLE = process.env.USERS_TABLE;
 const AES_SECRET = "56snbwuy#kdhuyethj39738626rhhgfd";
 const jwtSecret = "jskhshs54w57qjhyt2652geftsrhvhagskn@medgus";
 const client = new DynamoDBClient();
 const docClient = DynamoDBDocumentClient.from(client);

 app.use(express.json());
 const corsOptions = {
   origin: '*', // or '*' for all origins during development
   methods: ['GET', 'POST', 'PUT', 'DELETE', 'OPTIONS'],
   allowedHeaders: ['Content-Type', 'Authorization', 'X-Amz-Date', 'X-Api-Key', 'X-Amz-Security-Token', 'X-Requested-With'],
   credentials: true,
   optionsSuccessStatus: 200 // Some legacy browsers choke on status 204
 };

 // Use CORS with the specified options
 app.use(cors(corsOptions));
 app.get("/",(req,res)=>{
   res.send("Hello World")
 })
 //all routes starts from here
 app.post("/register", async (req, res) => {
   const {name,email,password,clg,phone} = req.body
   const hashpass = crypto.AES.encrypt(password,AES_SECRET).toString();
   //checking the user is exist or not;
   const getParams = {
     TableName: USERS_TABLE,
     Key: {
       email: email,
     },
   };
   try{
     const data = await docClient.send(new GetCommand(getParams));
   if(data.Item){
     return res.status(400).json({error:"User already exists",success:false})
   }
 }
   catch(err){
     console.log(err)
     res.status(500).json({error:"Could not create user",success:false})
   }
   //create user
   const params = {
     TableName: USERS_TABLE,
     Item: {
       name: name,
       email: email,
       password: hashpass,
       clg: clg,
       phone: phone,
     },
   };
 try{
 let a = await docClient.send(new PutCommand(params));
 res.status(200).json({message:"User created successfully",success:true})
 }
 catch(err){
   console.log(err)
   res.status(500).json({error:"Could not create user",success:false})
 }
 })
 //login endpoint
 app.post("/login", async (req, res) => {
   try{
     const {email,password} = req.body;
     const params = {
       TableName: USERS_TABLE,
       Key: {
         email: email,
       },
     };
     try{
      let data = await docClient.send(new GetCommand(params));
       if(!data.Item){
         return res.status(404).json({error:"User not found",success:false})
       }
       else{
         const decryptpass = crypto.AES.decrypt(data.Item.password,AES_SECRET).toString(crypto.enc.Utf8);
         if(decryptpass == password){
           const token = jwt.sign({email:email},jwtSecret);
           return res.status(200).json({message:"Login Successfull",success:true,token:token})
         }
         else{
           return res.status(401).json({error:"Invalid Password",success:false})
         }
       }
     }
     catch(err){
       console.log(err)
       res.status(500).json({error:"Login Failed ! Db Error.",success:false})
     }
   }
   catch(err){
     console.log(err)
     res.status(500).json({error:"Some thing Went Wrong .Try again later!",success:false})
   }
 })

 app.use((req, res, next) => {
   return res.status(404).json({
     error: "Not Found",
   });
 });
 exports.handler = serverless(app);
Explanation:
This Lambda function, implemented with Node.js and Express, interacts with Amazon DynamoDB to manage user registrations and logins. Key features include:
Dependencies: Utilizes
@aws-sdk/client-dynamodbfor database operations,crypto-jsfor password encryption,jsonwebtokenfor creating JWT tokens, andexpressfor routing.Environment Variables: Configures
USERS_TABLEfor DynamoDB, along with secret keys for AES encryption and JWT signing.Endpoints:
GET
/: Returns "Hello World" to indicate the server is running.POST
/register: Handles user registration by checking for existing users, encrypting passwords, and saving user data to DynamoDB.POST
/login: Authenticates users by verifying credentials and returning a JWT token upon successful login.
Error Handling: Includes robust error handling to provide informative responses for various scenarios, such as user existence and authentication failures.
404 Handling: Returns a 404 status for any undefined routes.
AWS Lambda Integration: The
exports.handlerallows the Express app to run in the AWS Lambda environment.
In summary, this function provides a secure user management system with encrypted passwords and JWT-based authentication, leveraging DynamoDB for data storage.
6. Deploying the Application
With everything configured, let’s deploy your application to AWS Lambda!
Steps:
Configure AWS Credentials
Set up your AWS credentials on your local machine:serverless config credentials --provider aws --key YOUR_AWS_ACCESS_KEY --secret YOUR_AWS_SECRET_KEYDeploy the Application
Run the following command to deploy your application:serverless deployThis command packages your application, uploads it to AWS, and creates the resources specified in
serverless.yml.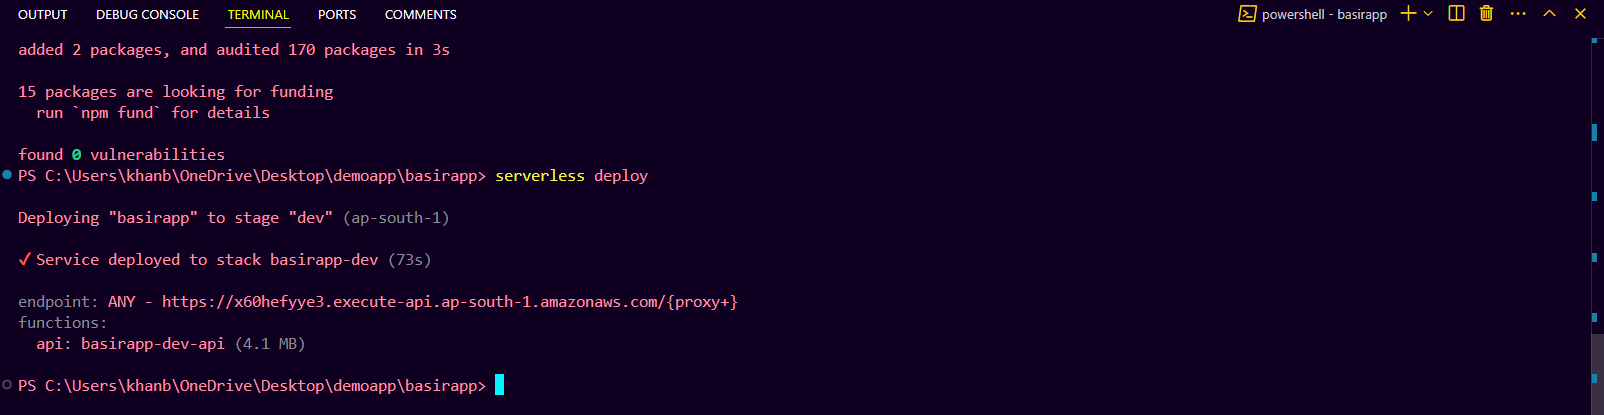
A DynamoDB table named "basirtable" is created through the
serverless.ymlconfiguration file, which defines the primary key as theemailattribute. The table operates inPAY_PER_REQUESTbilling mode, ensuring efficient scaling and cost management based on actual usage.
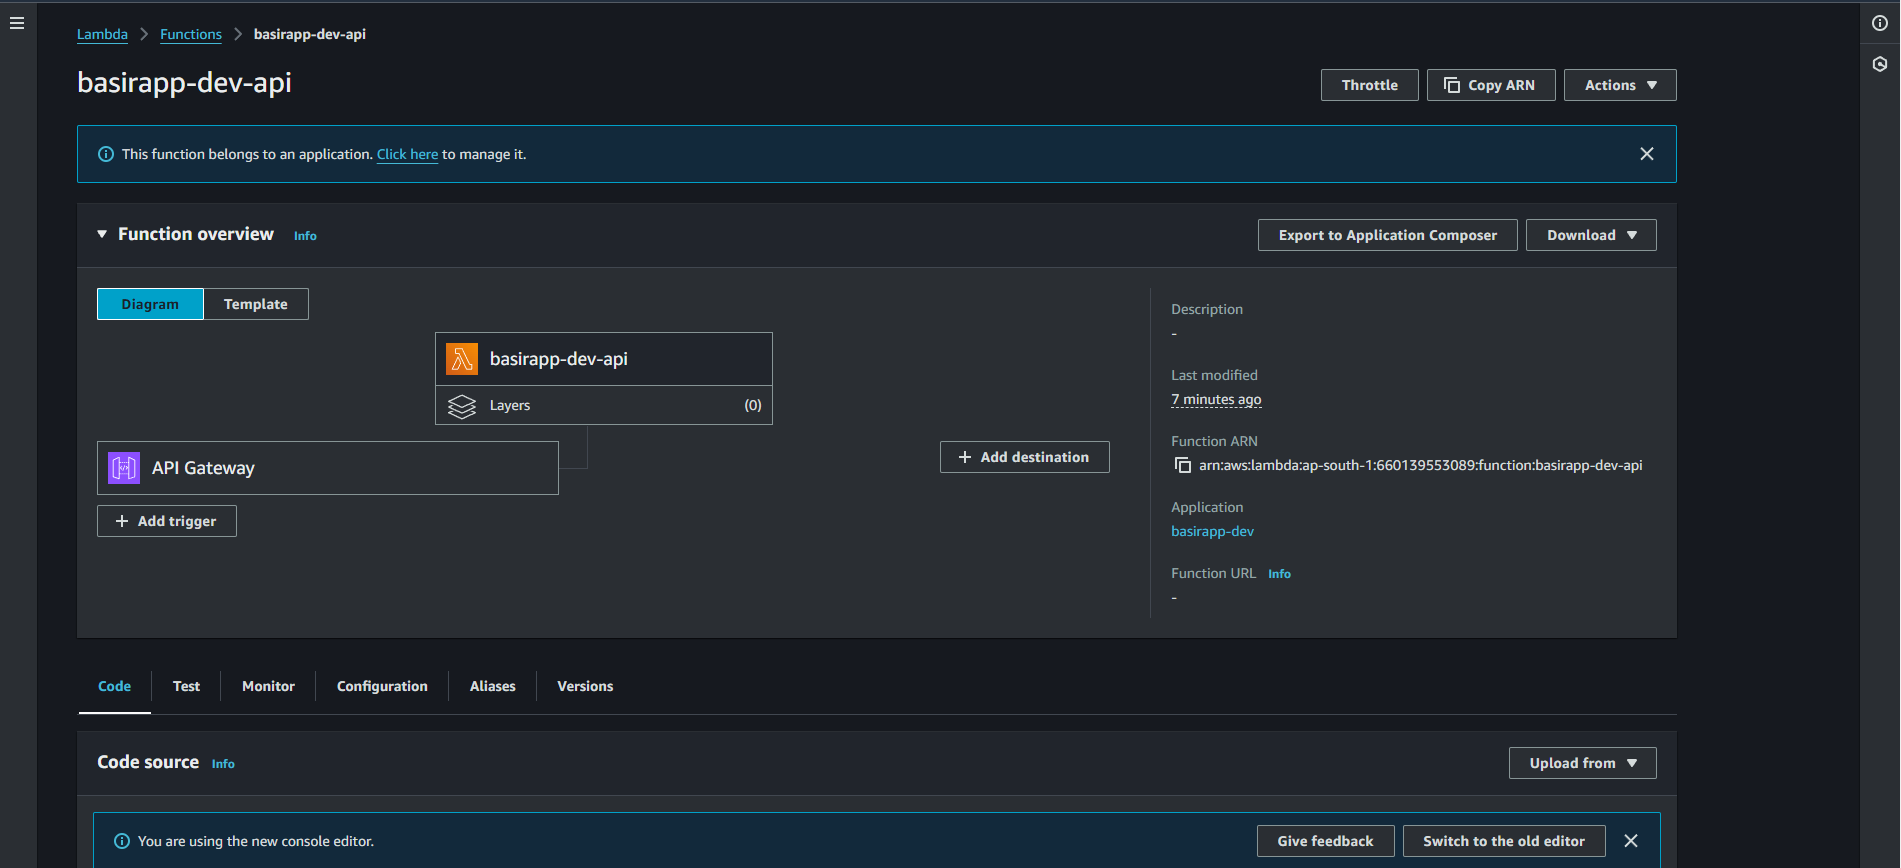
Also check lamda our function is deployed successfully.
7. Testing the Deployment
After deployment, test the endpoint to confirm that it works as expected.
Get the Endpoint URL
The deployment process will output an endpoint URL in the terminal.Send a Request to the URL
Use a tool like curl or Postman to send a GET request to the endpoint:GET https://x60hefyye3.execute-api.ap-south-1.amazonaws.com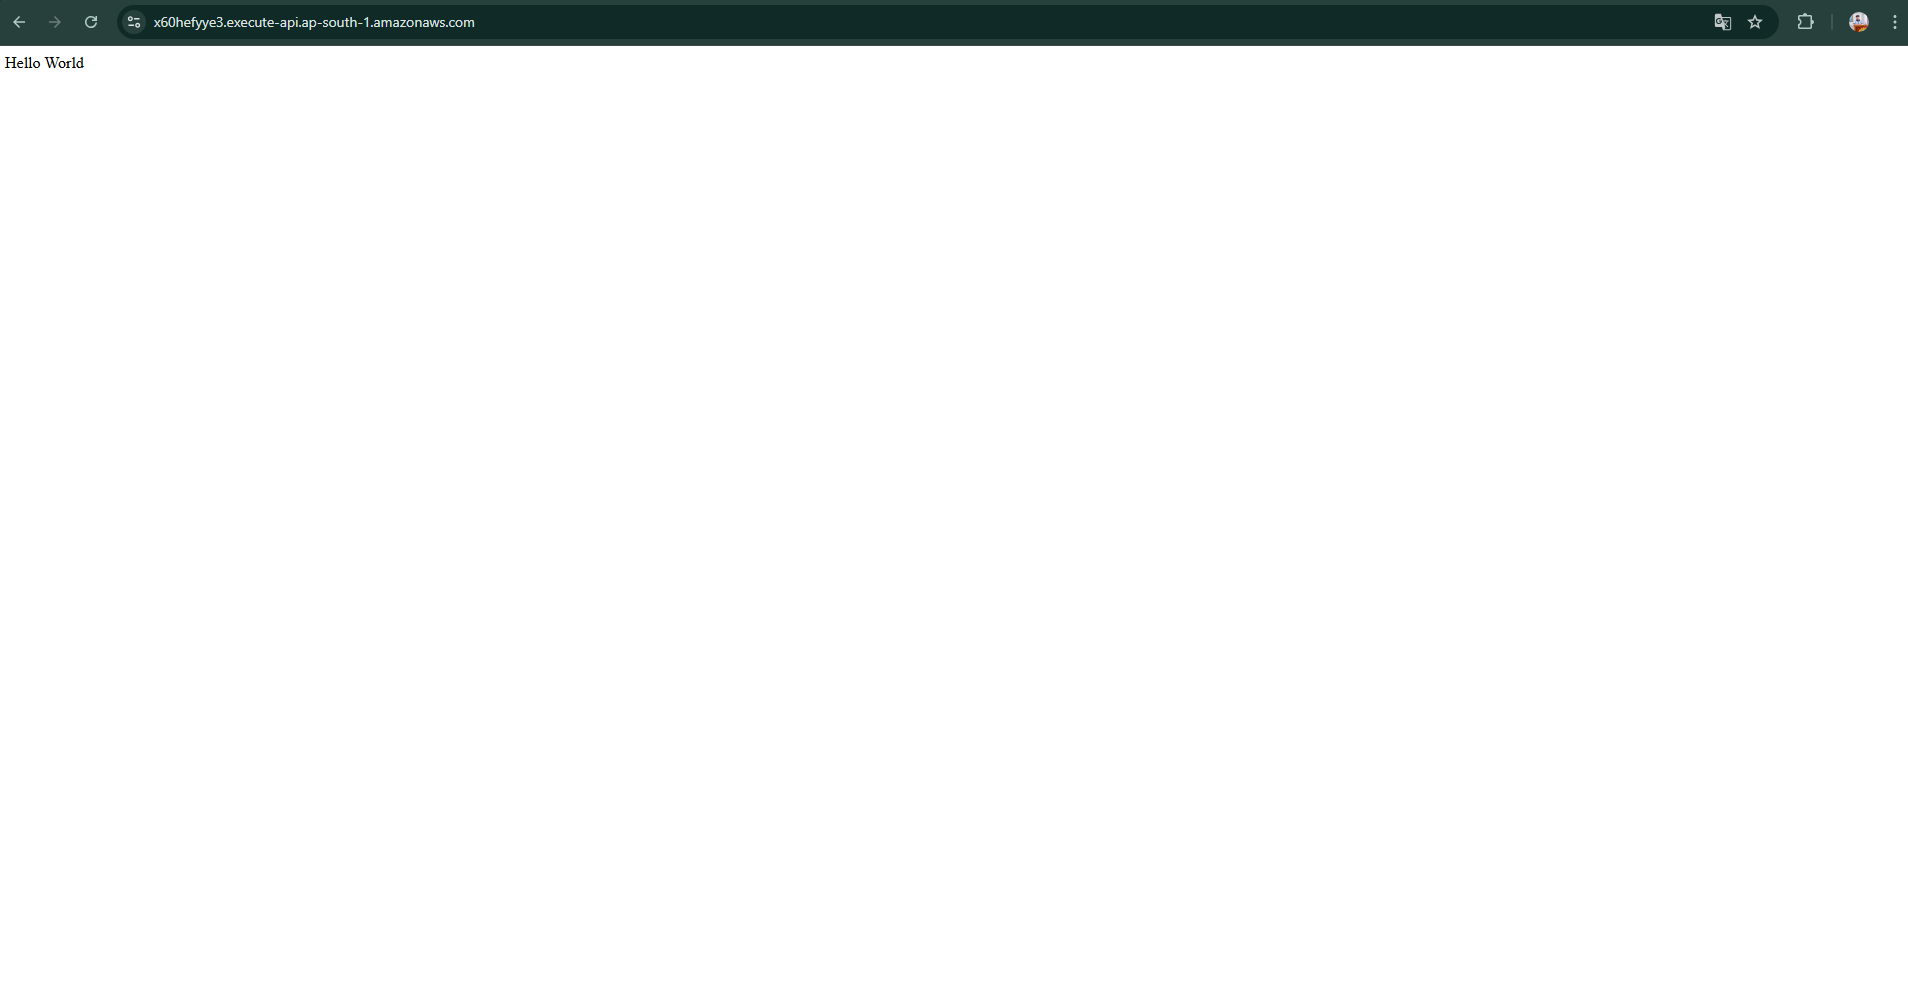
Sends a post request to create an account to “/register” end point through postman.
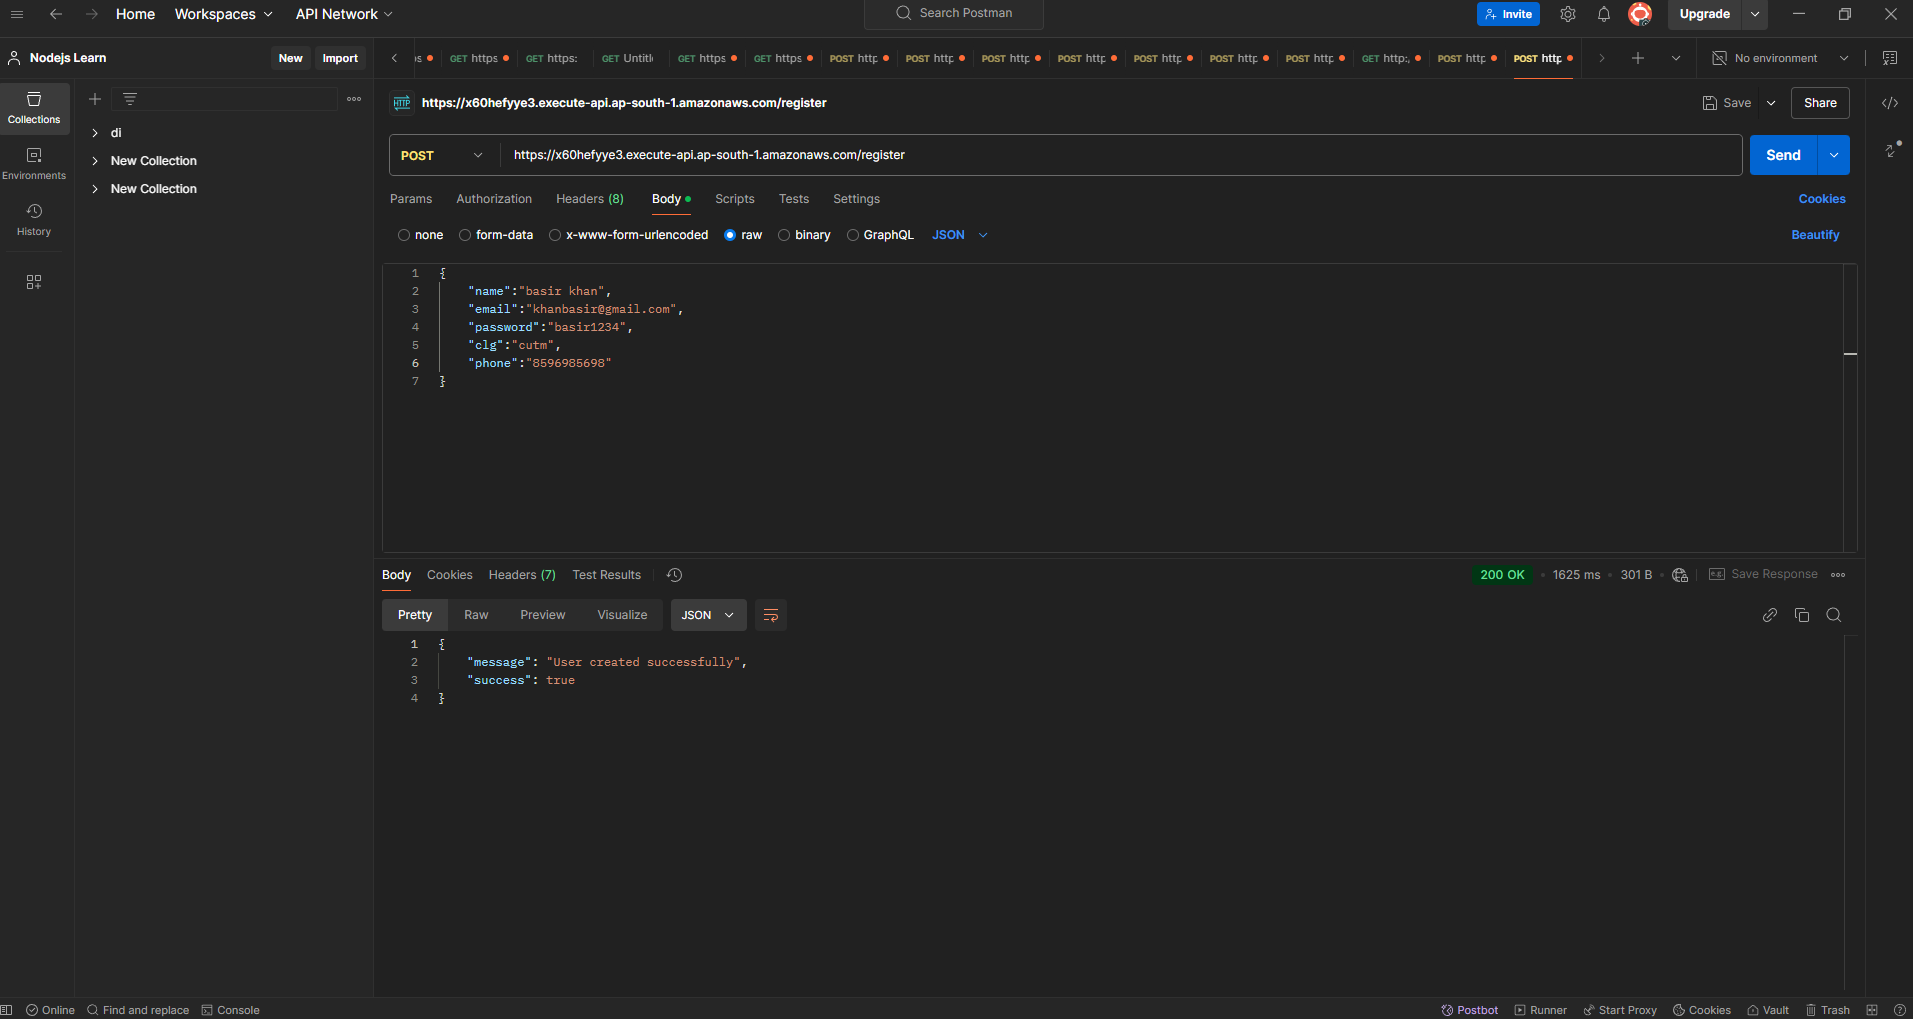
Feel free to check another end point as well in my case all end point is working fine.
8. Verifying DynamoDB Data
Now, let’s confirm that the data was saved in DynamoDB.
Go to the DynamoDB Console
In your AWS Management Console, open DynamoDB.Check the Table
Find your table (MyTable), and open it to view items. You should see the item created by your Lambda function.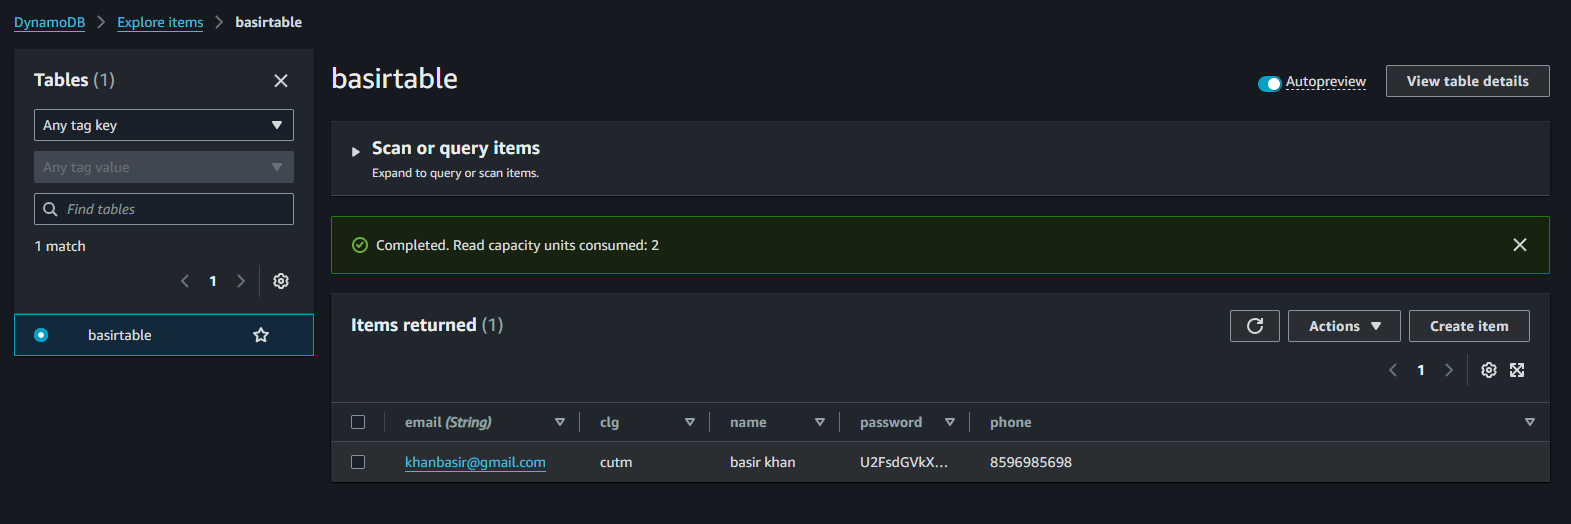
9. Wrapping Up
Congratulations! 🎉 You’ve successfully deployed a Node.js app to AWS Lambda using the Serverless Framework and integrated it with DynamoDB. This setup demonstrates the power of serverless architecture, reducing costs and simplifying scaling while allowing you to quickly deploy applications.
By following this guide, you now have a foundational setup you can build upon, expanding your application’s features or integrating more AWS services. Enjoy building with serverless, and keep experimenting to leverage AWS Lambda and DynamoDB for even more advanced use cases!
10. Bonous Section
In this section, we will connect the Lambda function to our frontend via a REST API, allowing seamless interaction between the backend and frontend components. This integration will enable us to handle requests efficiently, enhancing the application's responsiveness and user experience. Let's proceed with setting up the API endpoint to establish this connection.
1. Clone the github repo .
git clone https://github.com/BasirKhan418/basirapp-serverless-frontend.git
cd basirapp-serverless-frontend
npm i
Create a
.envfile and add the following content. Feel free to update the value ofVITE_BACKEND_URLwith the URL of your own Lambda function deployment or API gateway:VITE_BACKEND_URL=<your_lambda_function_url>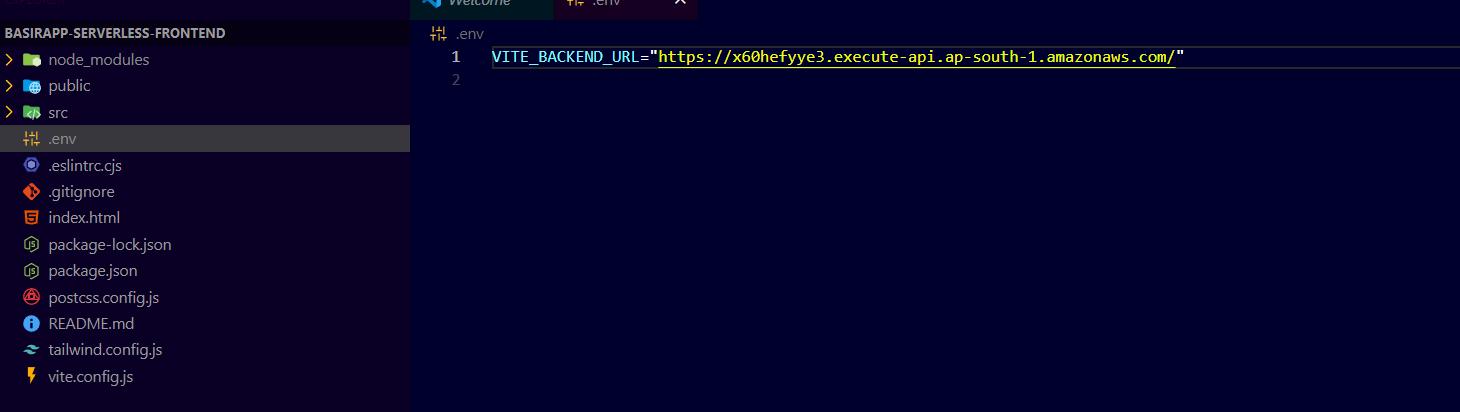
Build your project / frontend.
npm run build
After a successful build, a
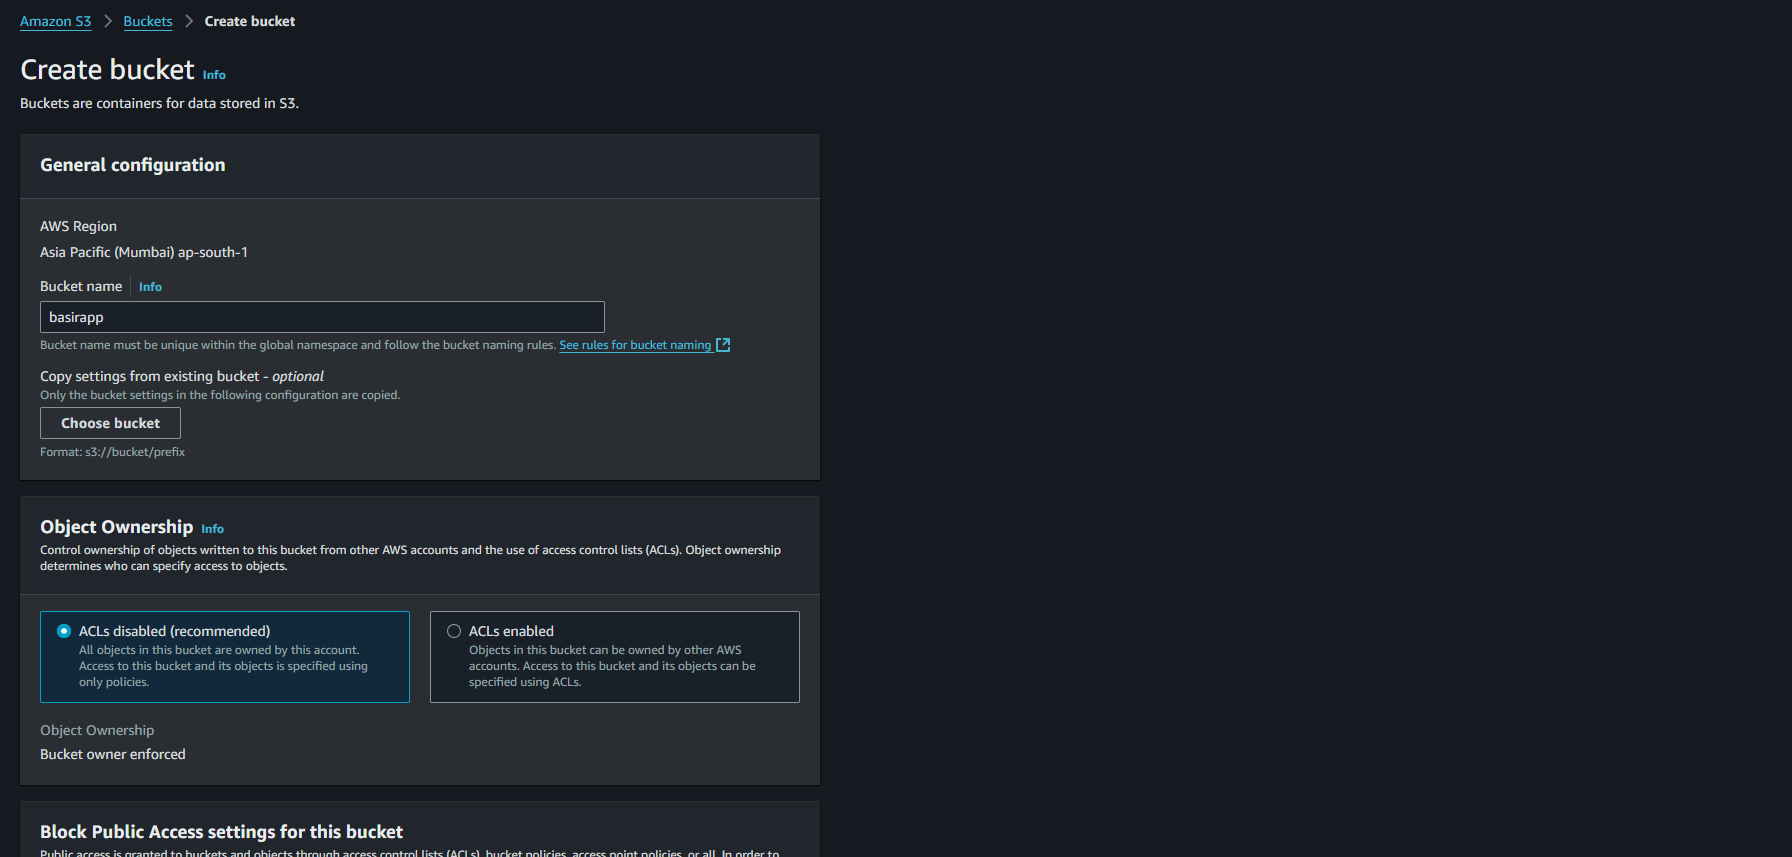
distfolder will be generated. This folder contains the production-ready files, which we need to upload to S3 to host the frontend application.Create an S3 bucket with your desired name. Uncheck the option to block all public access, leave all other settings as default, and click Create bucket to proceed.
Click on recently created bucket go to permissions and click on edit bucket policy and paste the content below of it and make sure to add your s3 arn.
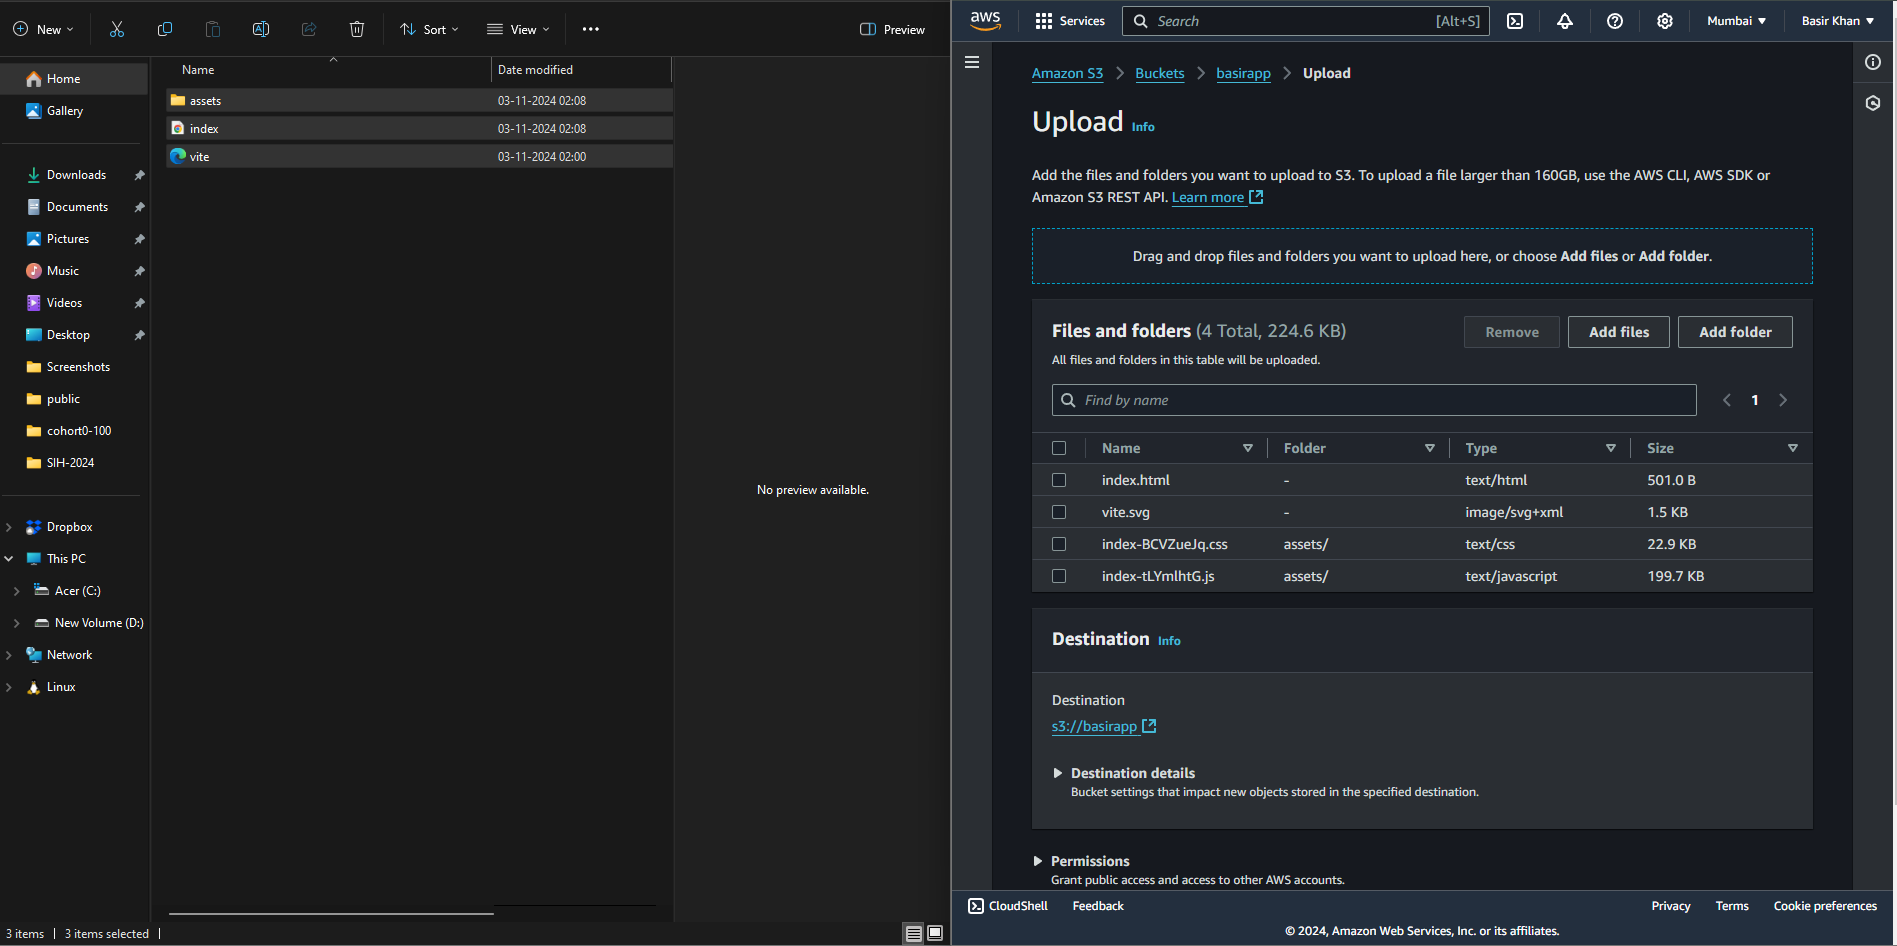
 {
     "Version": "2012-10-17",
     "Statement": [
         {
             "Sid": "Statement1",
             "Principal": "*",
             "Effect": "Allow",
             "Action": [
                 "s3:GetObject"
             ],
             "Resource": "your arn/*"
         }
     ]
 }
Upload you dist folder contents to s3
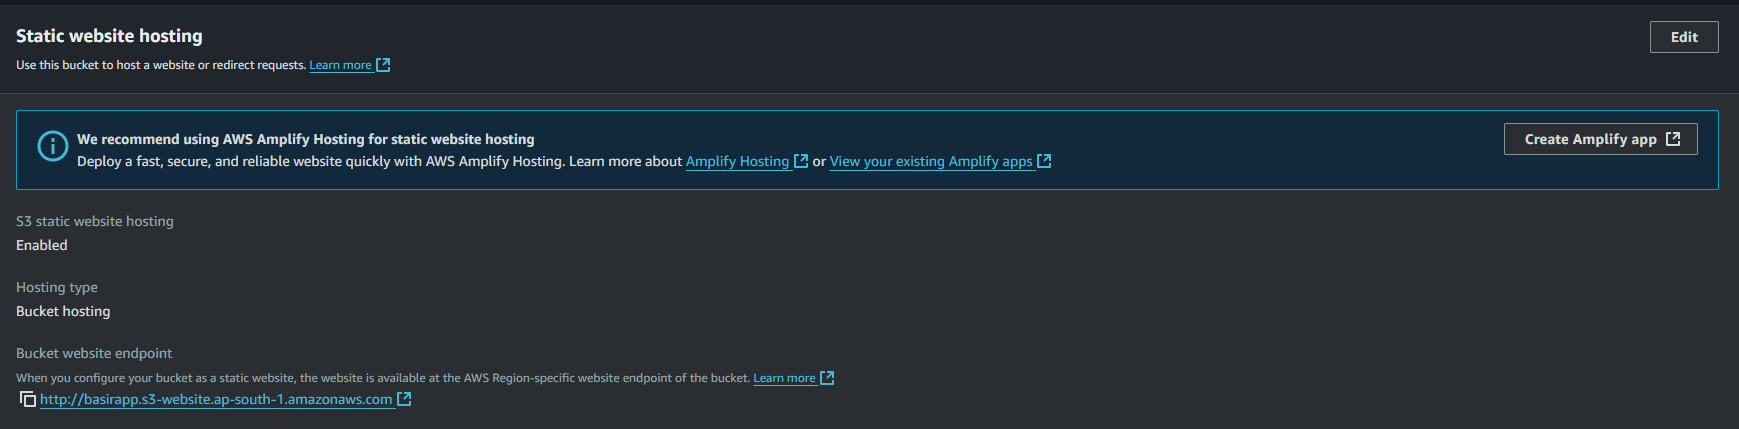
Navigate to the Properties tab, scroll down to the Static website hosting section at the bottom of the page, and click Edit. Enable static website hosting, enter
index.htmlin the Index document field, and click Save changes to apply.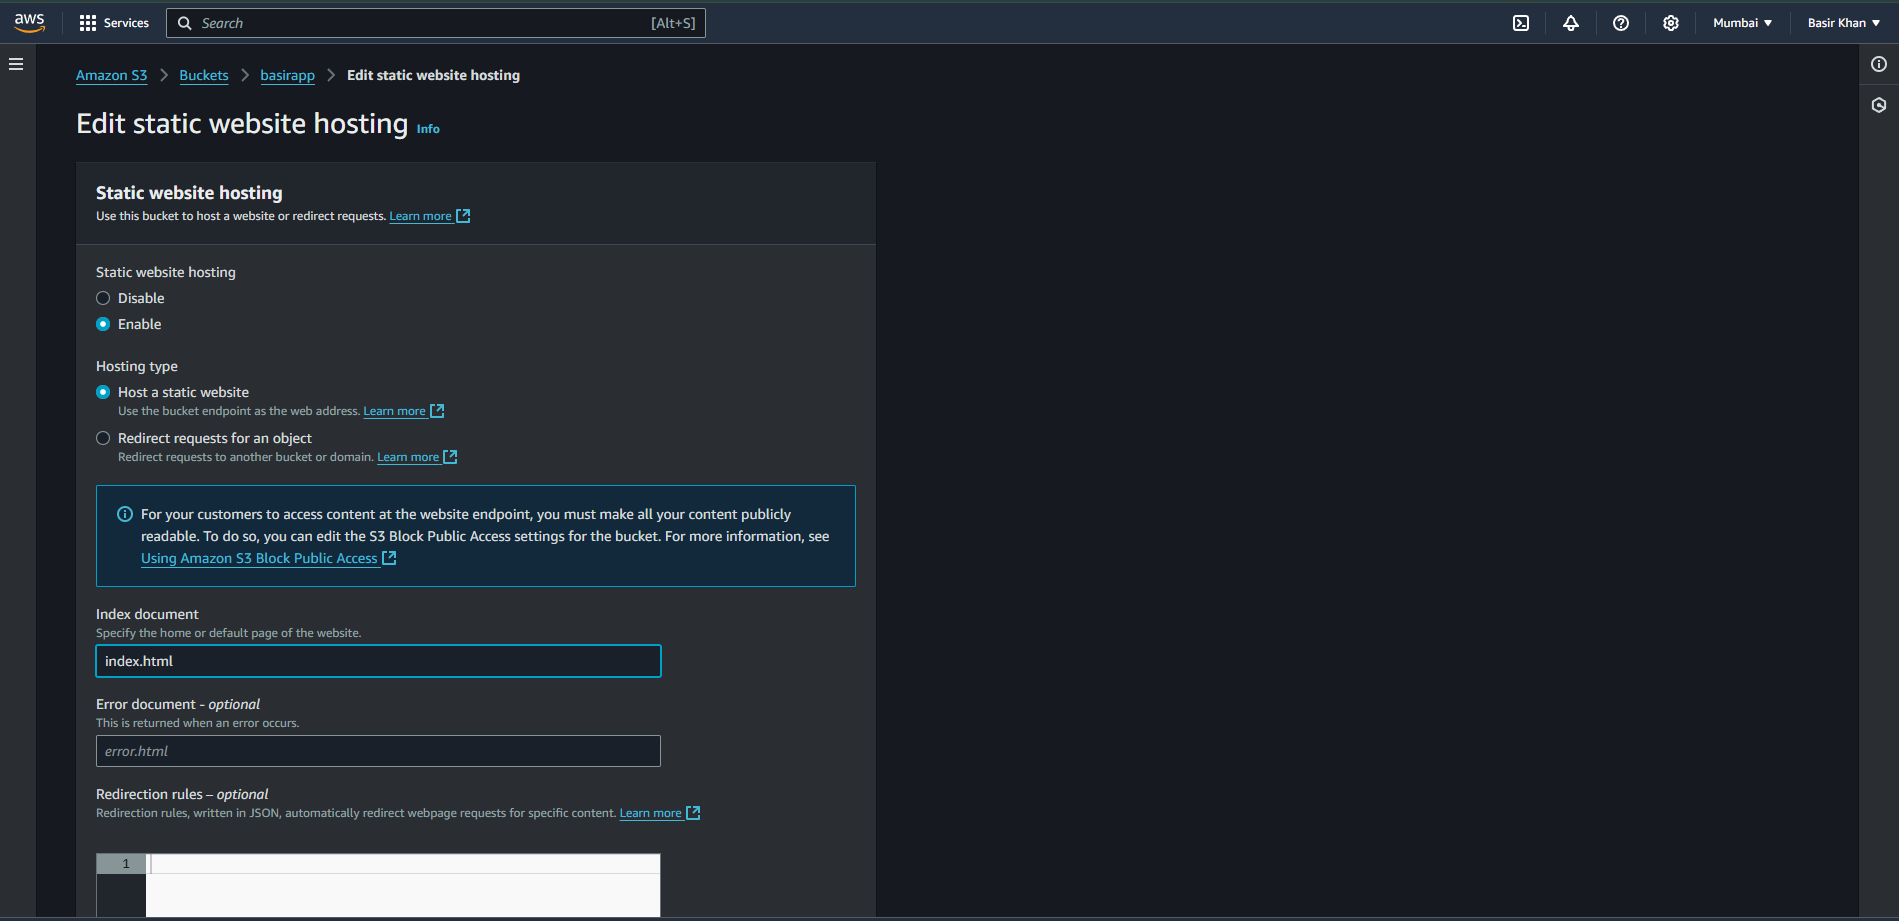
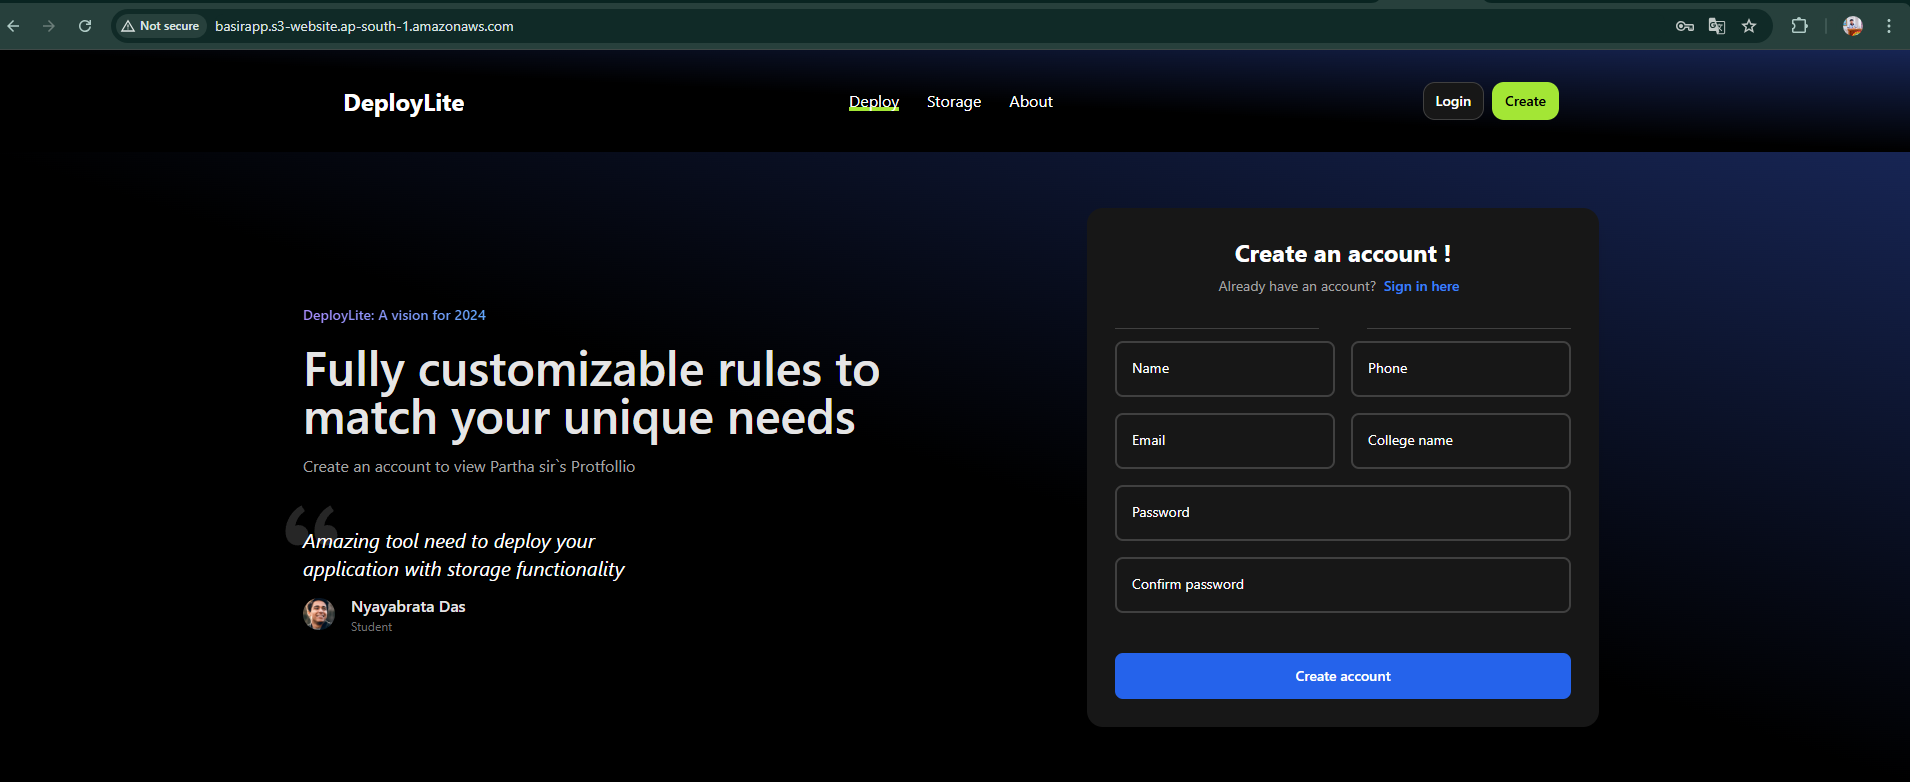
🎉 Hooray! Your frontend has been deployed successfully.
Open the generated link in a new tab, try registering, and check if the data is being saved in DynamoDB.
Conclusion:
By following this guide, titled "Deploy a Node.js App on AWS Lambda with DynamoDB Using Serverless Framework: Step-by-Step Guide," you've successfully deployed a full-stack, serverless registration and login system using AWS. Your Node.js backend now operates on AWS Lambda, with DynamoDB handling data storage, ensuring both security and scalability. Additionally, hosting the frontend on S3 offers a cost-effective, high-performance solution for web access.
This setup not only provides a robust foundation for authentication workflows but also streamlines application management by leveraging AWS services. With this approach, you're well-equipped to scale effortlessly, adding new features or integrating additional AWS services as needed.
In summary, this beginner-friendly, step-by-step guide has equipped you with the knowledge to deploy a fully functional serverless application in the cloud, perfect for developers looking to learn AWS Lambda and DynamoDB integration!