Getting Started with Cloudflare Tunnels: A Step-by-Step Guide 🌐🚀

Full-Stack Developer | MERN + Next.js | DevOps & Cloud Enthusiast
I specialize in building dynamic web applications using the MERN stack and Next.js. Currently exploring DevOps and cloud technologies to streamline workflows, automate deployments, and optimize cloud infrastructure for scalable, efficient solutions.
Securing and improving the speed of your online apps is more important than ever in the current digital era. A particularly noteworthy solution is Cloudflare Tunnels. You may open ports on your firewall and expose your local web server to the internet with this handy tool. This tutorial will assist you in understanding and using Cloudflare Tunnels, regardless of whether you're a developer testing a new project or a company owner trying to increase security.
Why wait for deployment? With Cloudflare Tunnels, you can host your app right from your laptop!
No More "Did you push it to Git?" – Your app is live on your laptop! 🖥️✨
Impress Your Friends – “Oh, just hosting my app on my laptop!” 😎
Go ahead, showcase your project while sipping your coffee! ☕🎉
What Are Cloudflare Tunnels? 🕳️
Cloudflare Tunnels (formerly known as Argo Tunnels) create a secure, outbound-only connection between your server and Cloudflare's global network. This means you can protect your applications without exposing your server's IP address, which significantly enhances your security posture.
Key Benefits of Using Cloudflare Tunnels:
Enhanced Security: Protects your server from direct exposure to the internet.
Easy Setup: Set up with just a few commands—no complex configurations required.
Global Load Balancing: Routes traffic efficiently across multiple servers.
Automatic HTTPS: Ensures secure connections without manual SSL certificate management.

Story Time: Meet Alex 👨💻
Let's illustrate the power of Cloudflare Tunnels with a story. Meet Alex, a web developer who recently launched a personal blog. One evening, while working on a new feature, he decided to test it locally. However, he faced a common dilemma: how to showcase his work without compromising security.
Enter Cloudflare Tunnels. With just a few commands, Alex was able to expose his local development server securely. His friends and colleagues could now access his blog at a unique URL without the risk of exposing his local environment to potential attacks.
How it works ?
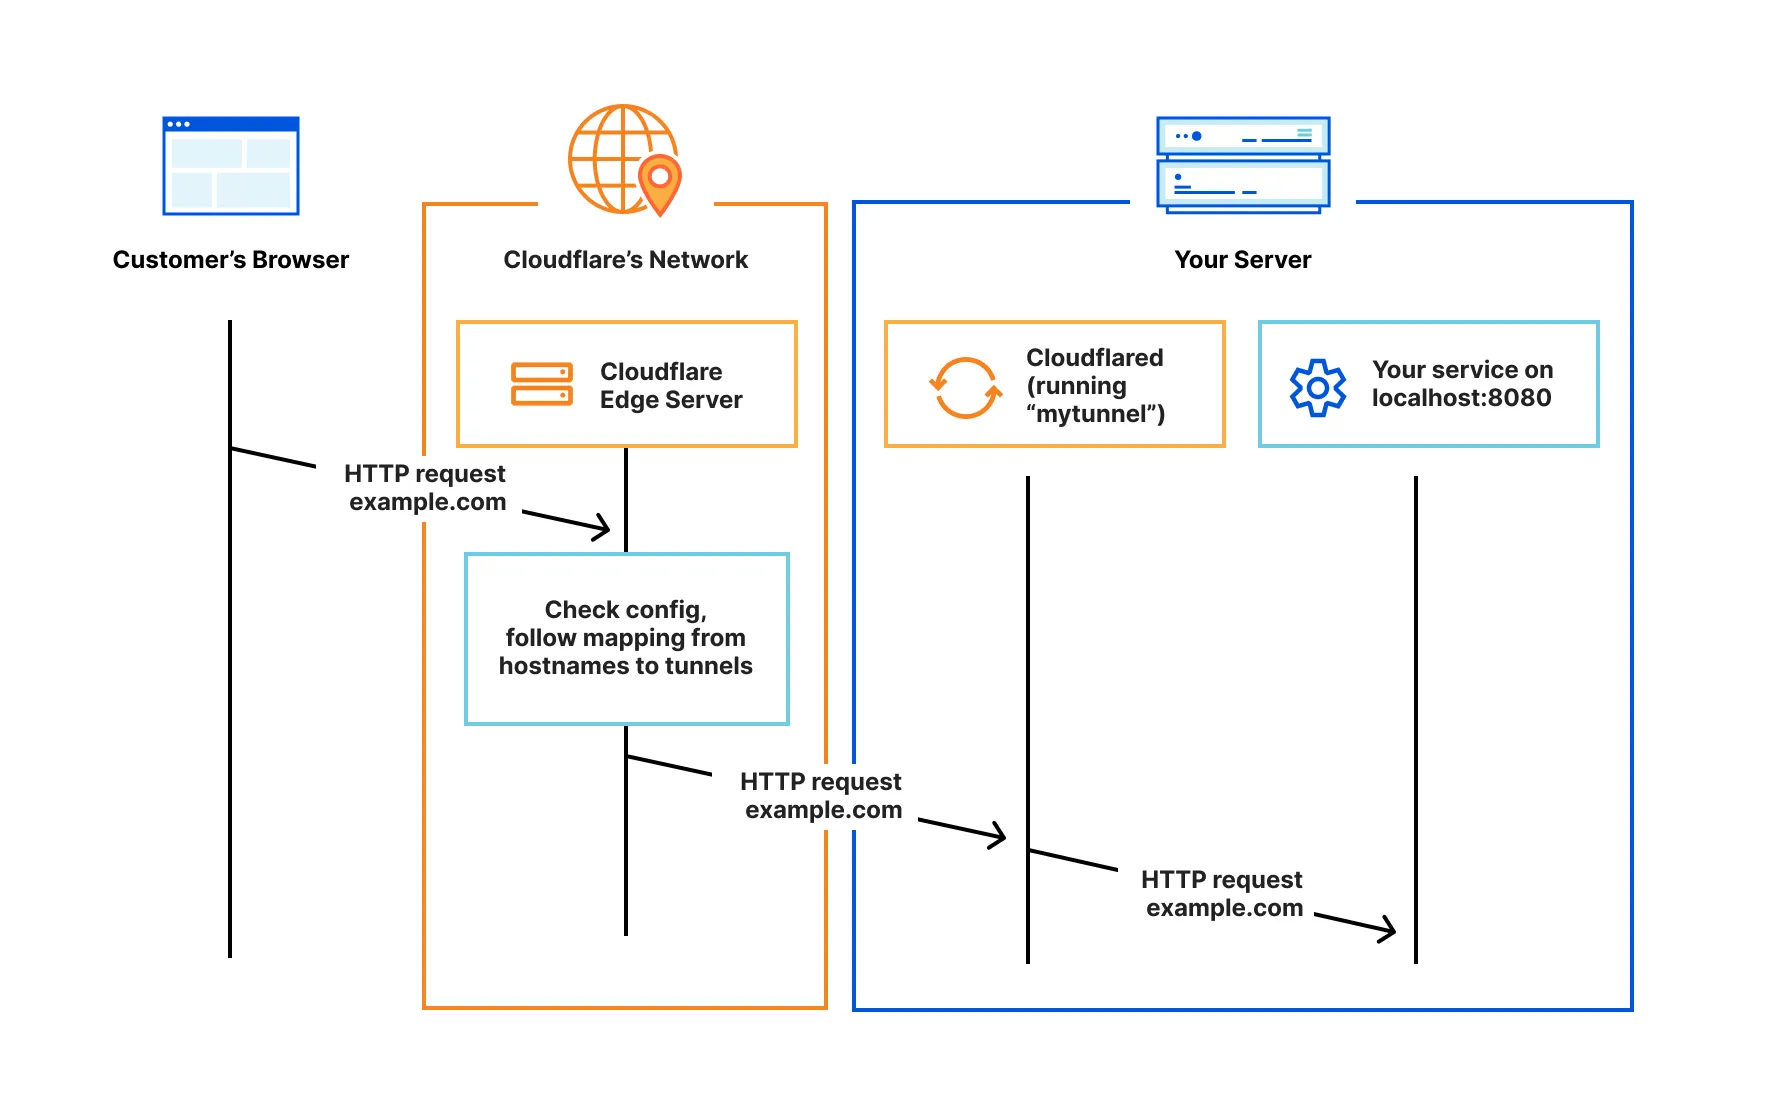
Cloudflare Tunnel provides you with a secure way to connect your resources to Cloudflare without a publicly routable IP address. With Tunnel, you do not send traffic to an external IP — instead, a lightweight daemon in your infrastructure (cloudflared) creates outbound-only connections to Cloudflare’s global network. Cloudflare Tunnel can connect HTTP web servers, SSH servers, remote desktops, and other protocols safely to Cloudflare. This way, your origins can serve traffic through Cloudflare without being vulnerable to attacks that bypass Cloudflare.
Cloudflared establishes outbound connections (tunnels) between your resources and Cloudflare’s global network. Tunnels are persistent objects that route traffic to DNS records. Within the same tunnel, you can run as many ‘cloudflared’ processes (connectors) as needed. These processes will establish connections to Cloudflare and send traffic to the nearest Cloudflare data center.
Refer to our reference architecture for details on how to implement Cloudflare Tunnel into your existing infrastructure
Installing Cloudflare Tunnel
Cloudflare Tunnel requires the installation of a lightweight server-side daemon, cloudflared, to connect your infrastructure to Cloudflare. If you are creating a tunnel through the dashboard, you can simply copy-paste the installation command shown in the dashboard.
To download and install cloudflared manually, use one of the following links.
GitHub repository
cloudflared is an open source project ↗ maintained by Cloudflare.
Latest release
Linux
You can download and install cloudflared via the Cloudflare Package Repository ↗.
Alternatively, download the latest release directly:
| Type | amd64 / x86-64 | x86 (32-bit) | ARM | ARM64 |
| Binary | Download ↗ | Download ↗ | Download ↗ | Download ↗ |
| .deb | Download ↗ | Download ↗ | Download ↗ | Download ↗ |
| .rpm | Download ↗ | Download ↗ | Download ↗ | Download ↗ |
macOS
Download and install cloudflared via Homebrew:
Terminal window
brew install cloudflared
Alternatively, download the latest Darwin arm64 release ↗ or latest Darwin amd64 release ↗ directly.
Windows
Download and install cloudflared via winget ↗:
Terminal window
winget install --id Cloudflare.cloudflared
Alternatively, download the latest release directly:
| Type | 32-bit | 64-bit |
| Executable | Download ↗ | Download ↗ |
Docker
A Docker image of cloudflared is available on DockerHub ↗.
Deprecated releases
Cloudflare supports versions of cloudflared that are within one year of the most recent release. Breaking changes unrelated to feature availability may be introduced that will impact versions released more than one year ago. For example, as of January 2023 Cloudflare will support cloudflared version 2023.1.1 to cloudflared 2022.1.1.
To update cloudflared, refer to these instructions.
Check it cloudflare is correctly installed or not ?
Cloudflare Tunnel can be installed on Windows, Linux, and macOS. as above we will discuss.
Confirm that cloudflared is installed correctly by running cloudflared --version in your command line:
Terminal window
cloudflared --version
Result shoud be 👇
cloudflared version 2021.5.9 (built 2021-05-21-1541 UTC)
Run a local service
The easiest way to get up and running with Cloudflare Tunnel is to have an application running locally, such as a React or Svelte site. When you are developing an application with these frameworks, they will often make use of a npm run develop script, or something similar, which mounts the application and runs it on a localhost port. For example, the popular create-react-app tool runs your in-development React application on port 3000, making it accessible at the http://localhost:3000 address.
Start a Cloudflare Tunnel
With a local development server running, a new Cloudflare Tunnel can be instantiated by running cloudflared tunnel in a new command line window, passing in the --url flag with your localhost URL and port. cloudflared will output logs to your command line, including a banner with a tunnel URL:
Terminal window
cloudflared tunnel --url http://localhost:3000
2021-07-15T20:11:29Z INF Cannot determine default configuration path. No file [config.yml config.yaml] in [~/.cloudflared ~/.cloudflare-warp ~/cloudflare-warp /etc/cloudflared /usr/local/etc/cloudflared]2021-07-15T20:11:29Z INF Version 2021.5.92021-07-15T20:11:29Z INF GOOS: linux, GOVersion: devel +11087322f8 Fri Nov 13 03:04:52 2020 +0100, GoArch: amd642021-07-15T20:11:29Z INF Settings: map[url:http://localhost:3000]2021-07-15T20:11:29Z INF cloudflared will not automatically update when run from the shell. To enable auto-updates, run cloudflared as a service: https://developers.cloudflare.com/argo-tunnel/reference/service/2021-07-15T20:11:29Z INF Initial protocol h2mux2021-07-15T20:11:29Z INF Starting metrics server on 127.0.0.1:42527/metrics2021-07-15T20:11:29Z WRN Your version 2021.5.9 is outdated. We recommend upgrading it to 2021.7.02021-07-15T20:11:29Z INF Connection established connIndex=0 location=ATL2021-07-15T20:11:32Z INF Each HA connection's tunnel IDs: map[0:cx0nsiqs81fhrfb82pcq075kgs6cybr86v9vdv8vbcgu91y2nthg]2021-07-15T20:11:32Z INF +-------------------------------------------------------------+2021-07-15T20:11:32Z INF | Your free tunnel has started! Visit it: |2021-07-15T20:11:32Z INF | https://seasonal-deck-organisms-sf.trycloudflare.com |2021-07-15T20:11:32Z INF +-------------------------------------------------------------+
In this example, the randomly-generated URL https://seasonal-deck-organisms-sf.trycloudflare.com has been created and assigned to your tunnel instance. Visiting this URL in a browser will show the application running, with requests being securely forwarded through Cloudflare’s global network, through the tunnel running on your machine, to localhost:3000:


Create a remotely-managed tunnel (dashboard)
Follow this step-by-step guide to get your first tunnel up and running using Zero Trust.
Prerequisites
Before you start, make sure you:
1. Create a tunnel
Log in to Zero Trust ↗ and go to Networks > Tunnels.
Select Create a tunnel.
Choose Cloudflared for the connector type and select Next.
Enter a name for your tunnel. We suggest choosing a name that reflects the type of resources you want to connect through this tunnel (for example,
enterprise-VPC-01).Select Save tunnel.
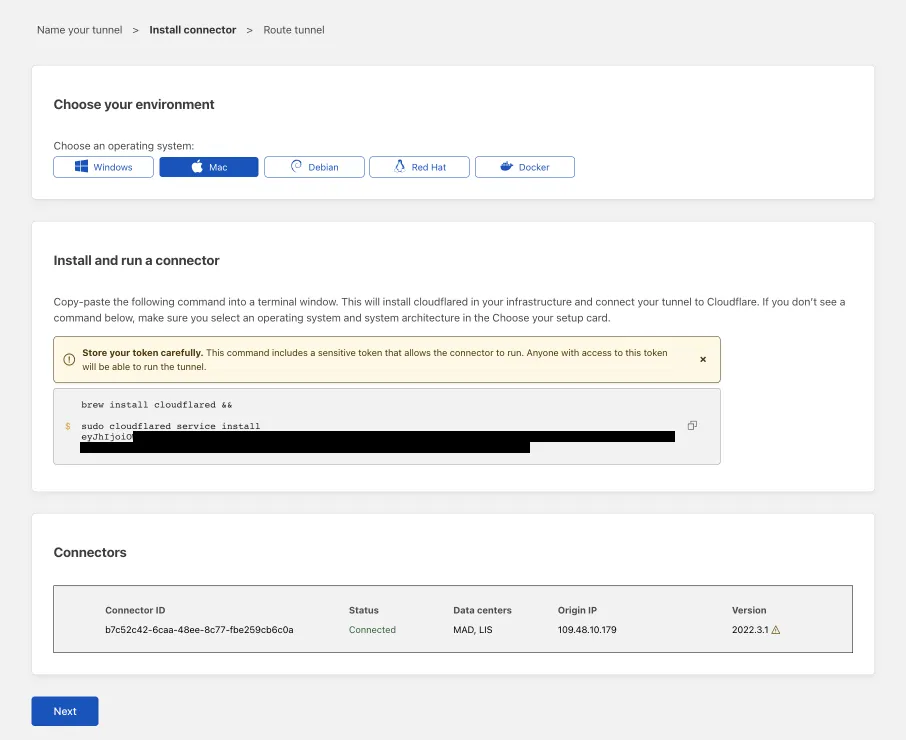
Next, you will need to install
cloudflaredand run it. To do so, check that the environment under Choose an environment reflects the operating system on your machine, then copy the command in the box below and paste it into a terminal window. Run the command.Once the command has finished running, your connector will appear in Zero Trust.
Select Next.
The next steps depend on whether you want to connect an application or connect a network.
2. Connect an application
Follow these steps to connect an application through your tunnel. If you are looking to connect a network, skip to the Connect a network section.
In the Public Hostnames tab, choose a Domain and specify any subdomain or path information.
Specify a service, for example
https://localhost:8000.Under Additional application settings, specify any parameters you would like to add to your tunnel configuration.
Select Save tunnel.
3. Connect a network
Follow these steps to connect a private network through your tunnel.
In the Private Networks tab, add an IP or CIDR.
Select Save tunnel.
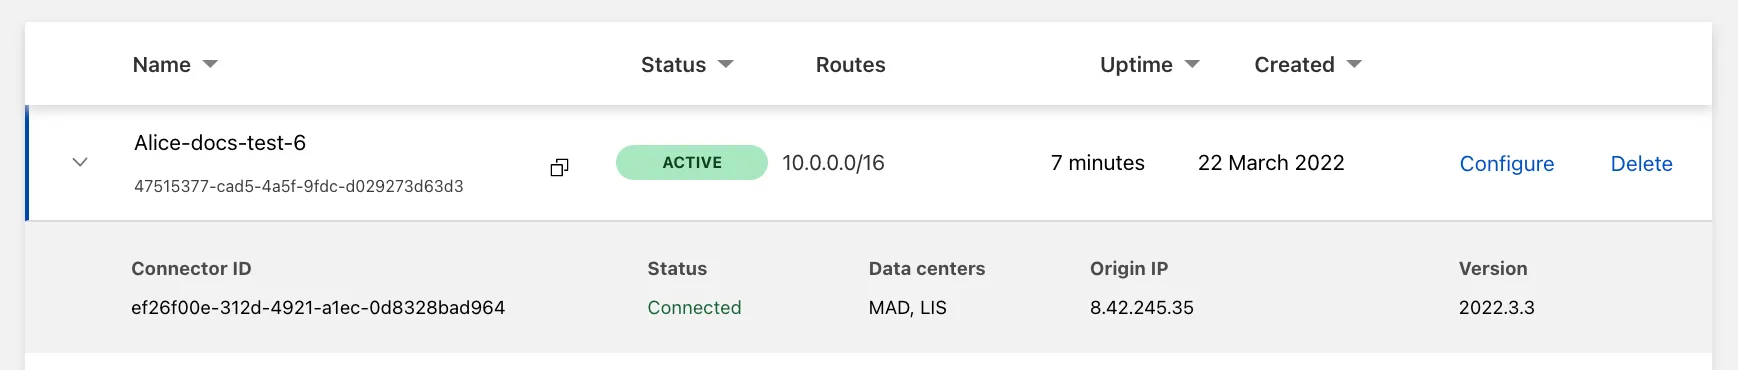
4. View your tunnel
After saving the tunnel, you will be redirected to the Tunnels page. Look for your new tunnel to be listed along with its active connector.